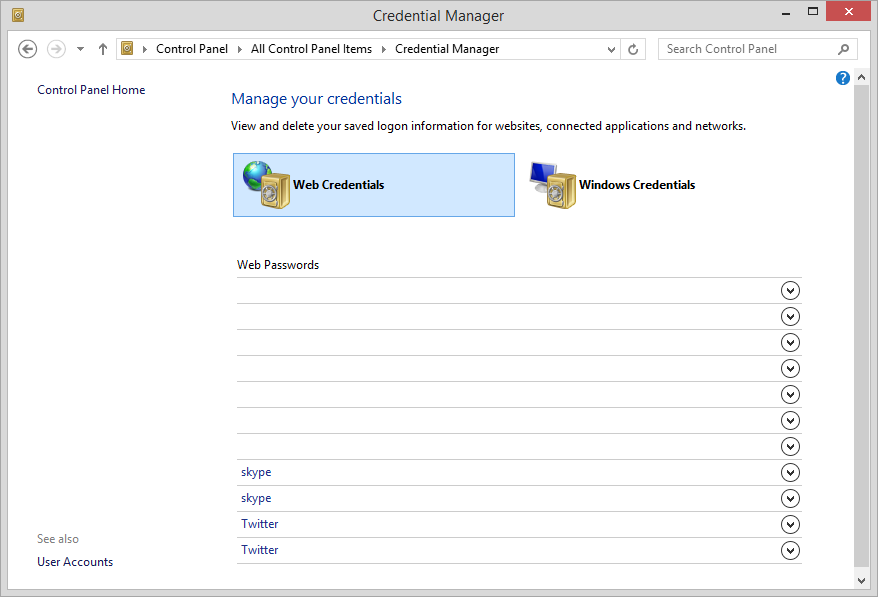
Just a quick post to inform everyone who is interested where to find and preserve the Internet Explorer and Windows Credentials used to log in to SharePoint websites, web-portals and other websites.
Normally you would find these settings within Windows, at the following place: “Control Panel \ All Control Panel Items \ Credential Manager”
figure 1.1: Credential Manager
The folder location where these files can be found on your own computer for these three folders and it’s place in the registry are:
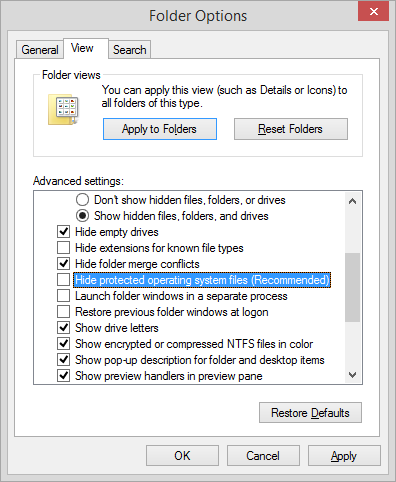
If we take a look into the “Credentials” folders you will not see anything unless you uncheck: “Hide protected operating system files (Recommended)” in the folder options:
figure 1.2: Folder options
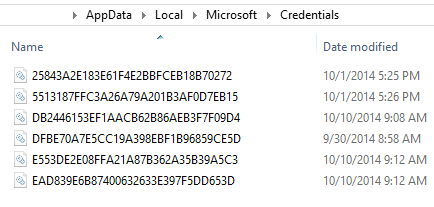
Once this has been done, have a look into your .\Credentials folders to find files like these:
figure 1.3: Credentials
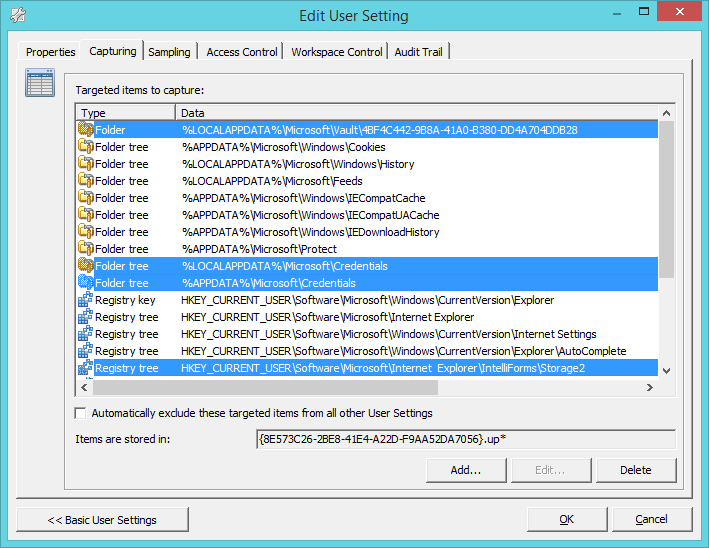
Now if we want to preserve the information for this section with RES Workspace Manager, since you might have configured mandatory profiles with RES Zero Profile technology. Just add the following four paths to your “User Setting template” for Internet Explorer 11. (Alternatively you may want to create a dedicated User Setting for these credentials)
Remarkably, the first path needs to be added into RES Workspace Manager including the GUID folder: 4BF4C442-9B8A-41A0-B380-DD4A704DDB28
To learn more about the credentials Vault present in Windows, please visit this excellent blog written by “Derek Melber”: Saving Credentials on Windows Computers
figure 1.6: RES Workspace Manager – Edit User Setting
Click OK, and you are good to go! Now passwords entered on websites will be preserved in between user sessions.
More and more I encounter company’s who already own a distribution mechanism, or already have implemented the Microsoft Deployment Toolkit, and are looking for a distribution mechanism or deployment mechanism.
Since MDT is free to use, and RES Automation Manager costs a fraction of the cost then System Center Configuration Manager or nowadays the entire System Center Suite. This makes allot of sense to allot of people, that integrating or combining MDT with RES Automation Manager is a strong combination to service workstations, servers or other hardware that needs to be provided with an operating system and software.
Although I’m pro MDT, I’m not necessarily against RES Automation Manager. I only want to point out that the need for a management tool depends on requirements that are drafted by the people who determine the company policy on this topic.
Now it may occur that you or your organization already has RES Automation Manager incorporated into your organization. All the modules, projects and run-books have been figured out, so taking them out of RES Automation Manager to put them in MDT might be a bit crazy, especially when those modules are also used in other situations.
Today I’m going to show you how you can incorporate RES Automation Manager in MDT!
First of all we need to have the RES Automation Manager Agent, which needs to be imported in MDT as an application.
Depending on which kind of agent you have created from RES Automation manager, the standard MSI or the MSI preconfigured to run a certain project, you’ll need to specify the following installation parameters:
Standard RES AM Agent installation, invoking a project:
Now, for instance, If you want to deploy a computer with MDT and manage it afterwards, then the last step in your task sequence should be the installation of RES Automation Manager. And the FinishAction in your customsettings.ini should be set to either:
1
2
FinishAction=
FinishAction=LOGOFF
Leaving the FinishAction property blank, will simply do nothing. The machine will be finished, MDT will clean-up it’s act, and RES Automation Manager will kick in, and depending on if you have created a project that always should be invoked on this particular deployment, RES Automation Manager will begin executing this project.
The second option FinishAction=LOGOFF, will logoff the machine, making it unavailable for people to access the computer will it is being configured by RES Automation Manager.
Today I encountered a different scenario which put’s things in a whole other perspective. For this particular client who is building an Enterprise VDI image, the machine will be deployed with MDT, and when MDT is finished, RES Automation Manager will finalize the installation with middleware components and other configuration’s, before it is being converted to a VMware Snapshot which is at the basis of this VDI solution.
Now I received a question today, to use this same RES Automation Manager project, with some minor configuration changes to be used when creating a reference image with MDT on physical hardware to deploy to one and the same hardware model.
Just to be clear, this goes against the concept of MDT. Building a reference image on physical hardware is basically a no-go. Due to driver-store pollution, driver conflicts etc. this is something you want to avoid at all costs. Also using another tool to do the same as MDT is capable of, especially when creating a reference image, also might be a bit contradictory. However I do not question the client’s request.
To achieve this, we again need the RES Automation Manager Agent incorporated as an application within MDT.
figure 1.1: Install RES Automation Manager Agent 2014
Then in our task sequence we need to make use of the “LTISuspend.wsf” script, which temporarily pauses the MDT task sequence at any moment that the script is called. As you can see here, this happens right after the installation of RES Automation Manager.
If you don’t pause your task sequence, or if RES Automation Manager isn’t the last action in your MDT Task Sequence, MDT will just continue executing other tasks when the RES Automation Manager Agent is installed! Reversed, RES Automation Manager will terminate the MDT Task Sequence process and you’ll be left with an incomplete deployment!
figure 1.2: LTISuspend.wsf
After MDT has been configured, we need to create a module in RES Automation Manager, called: “Operation: Resume Suspended Task Sequence”
figure 1.3: RES Automation Manager – Module
This module holds an “Execute Command” task
figure 1.4: RES Automation Manager – Execute Command
The “Execute Command” action, contains the following command line:
figure 1.5: RES Automation Manager – Execute Command – Settings
Now make sure that this particular module is set to last. After this no other task from RES Automation Manager may be executed:
figure 1.6: RES Automation Manager – Project
Now, when RES Automation Manager is finished executing the project, the last thing RES Automation Manager will do, is execute the resume function of the “LTISuspend.wsf script”.
After this, MDT will continue the task sequence, and capture the machine into a WIM file. If you don’t want to have the RES Automation Manager Agent into your reference image, you’ll need to provide an un-installation command in MDT before the machine is being captured. Uninstalling software is executed by using:
1
Msiexec/x{7126FE56-577F-42CD-9EB1-D3E4BFDEFA9A}
In addition, you might want to delete the following REG KEY. Since it holds the GUID RES AM uses to authenticate against the database.
This can be done by executing the following command:
Today I encountered a challenge which I think needed to be shared with you all.
Currently I’m working with other colleagues on building a brand new Citrix XenApp 7.5 environment based on Server 2012 R2 x64 in combination with RES Workspace Manager 2014 SR1, together with mandatory profiles and RES Zero Profiling technology.
A user who works with several java applications encountered the following problem:
figure 1.1: Java Application Blocked by Security Settings
Since this error is generated by Java, I immediately went to the control panel to investigate the available options for configuring Java.
You can find the Java control panel applet, when you change the “Category” view in your control panel to “Large” or “Small” icons.
figure 1.2: Control Panel – Java (32-bit)
Click the “Java (32-bit)” shortcut in your control panel, and the following screen will appear:
figure 1.3: Java Control Panel
Now for example, if we want to change the security level of Java, which prevents the current Java application from running, change the security level from “High”
figure 1.4: Java Control Panel – Security High
To “medium”
figure 1.5: Java Control Panel – Security Medium
And click “OK”.
This would do the trick, but how can this setting be passed on to users logging on to a Citrix environment with mandatory profiles?
Since we are using RES Workspace Manager, I did the following:
First of all I needed to capture the setting with some kind of tool. You’ve got two options here:
Regshot, wich is an opensource and free tool to capture and compare system state registry and file system changes between two snapshots and show the result as to what has changed
ProcMon, which is a great tool for checking realtime processes, registry behavior and much more.
I chose for ProcMon, (make sure it runs in admin mode!)
figure 1.6: ProcMon
Now, when ProcMon is started, make sure you stop capturing (leave ProcMon running for some time and you’ll know why 😉 ) and make sure the list of captured events is made empty by clearing the screen:
figure 1.7: ProcMon – Capture and Clear Screen
Now that’s out of the way, since we want to capture some Java activity, go to Filter in the menu, and add the following filter: “Path” contains “Java”
figure 1.8: ProcMon – Add filter
Click “Add” and then “Apply”.
Now you have made a filter only showing event’s which concern the word “Java”.
Now repeat the configuration of the Java security level on the Java control panel menu. And you will see the following appearing in ProcMon:
figure 1.9: ProcMon – Results
As you can see here, Java writes the changes to the following path: “C:\Users\Administrator\Appdata\LocalLow\Sun\Java\Deployment\deployment.properties”
Examining this location reveals the following:
figure 1.10: Windows Explorer – File location
If you open this file with notepad, you will find several properties which indicate how Java is configured on your machine.
figure 1.11: Deployment.Properties – Content
So there you have it: the Java configuration file.
The same goes when adding certain trusted websites to the Java applet:
figure 1.12: Java Control Panel – Edit Site List
If you click “Edit Site list” the following screen appears:
figure 1.13: Exception Site List
By clicking “Add”, another screen appears:
figure 1.13: Exception Site List – Adding the website
For example, by adding Google.com to the list of trusted sites to run Java-applets, you’ll receive security warning if you click “OK”
figure 1.13: Exception Site List – Just click OK…
And by clicking “Continue”, the website will be added to the list of trusted sites to run Java-applets. Again a setting which will be written to a config file, this time on the following location:
If you open this file with notepad, you will find the website we’ve just added:
figure 1.15: Exception.Sites – Content
Now, how can this be incorporated for every user signing into a Citrix environment with mandatory profiles you ask?
In the RES Workspace Manager console, go to “Administration > Custom Resources”, and add the deployment.properties and / or the exception.sites file as a custom resource:
figure 1.16: RES Workspace Manager Console – Custom Resources
Go to “Composition > Execute Command” and click “New Command”
In the properties pane, make sure the script is executed “At logon after other actions” as command specify the following: “%script%”, this makes sure you can use the “Script” pane which can hold far more complex and even more important, multiple lined scripts.
figure 1.16: RES Workspace Manager – Execute Command
As you can see, I’ve pasted the following script in the “Script” pane:
figure 1.17: Execute Command – Script
The exact content of the script is:
script 1.1: Copy Java security permission file to designated location
figure 1.18: RES Workspace Manager – Execute Command
Now each time a user log’s into the Citrix environment the Java configuration file “deployment.properties” will be copied from the database used by RES, into the specified location. Setting the correct Java security level, trusted websites and other related settings for each user, during each session.
As you can see an entire different warning appears, which is just perfectly normal. It hopefully makes users aware of the potential risk opening the Java applet. But 90% of the users will happily make use of their trigger-finger twitch!
figure 1.19: Java Security Warning
Got anything to add, got a trick up your sleeve which can simplify this action, or am I just doing it all wrong? 🙂 Please leave your comments in the comment section!