Monthly Archives: May 2012

MDT 2012 – Creating those nice round figured Hard Disk partitions!

Published / by Rens Hollanders / 4 Comments on MDT 2012 – Creating those nice round figured Hard Disk partitions!

Partitioning and formatting disks while deploying an operating system with MDT 2010 or 2012 is a cool thing to do. The only problem I walk into is that I cant create a round figured hard disk. When I open ‘My Computer’ on my newly deployed computer and I configured the partition step in MDT to create a partition of 80 Gb, I always end up with a disk that has a size of 79,8 Gb.

Because Windows and Harddisk companies calculate in metric numbers and computers use Binary numbers (remember 1 mb is actually 1024 kb) we need to create a round figured number. So before Windows 7 > 80 times 1024 equals 819200 Megabytes =  80 Gigabites. But with Windows 7 theres just one little thing we have to add up to the requested partition size > the 100 Mb system partition with system files on it.

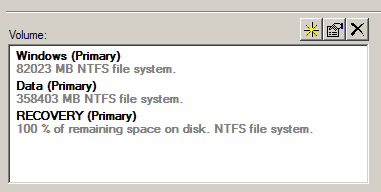
Adding 100 Mb to the already existing 819200 equals 82020, I add in an additional extra 3 Mb because sometimes it would still show us the 79,9 Gb. So the final size we have to fill in is 82023.

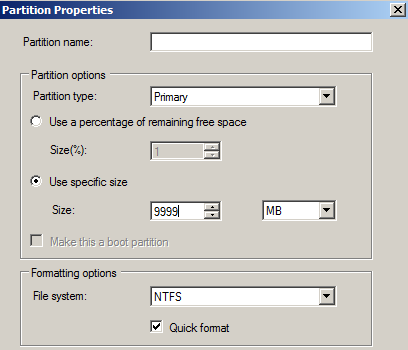
Now try to enter the number of 82023 Mb in MDT 2010 and 2012 in the ‘Format and Partition’ step and you will soon find out this is not possible. The GUI doesnt let you add more the 9999 Mb’s and then you are forced to use Gb’s wich result in 79,8 Gb disks.

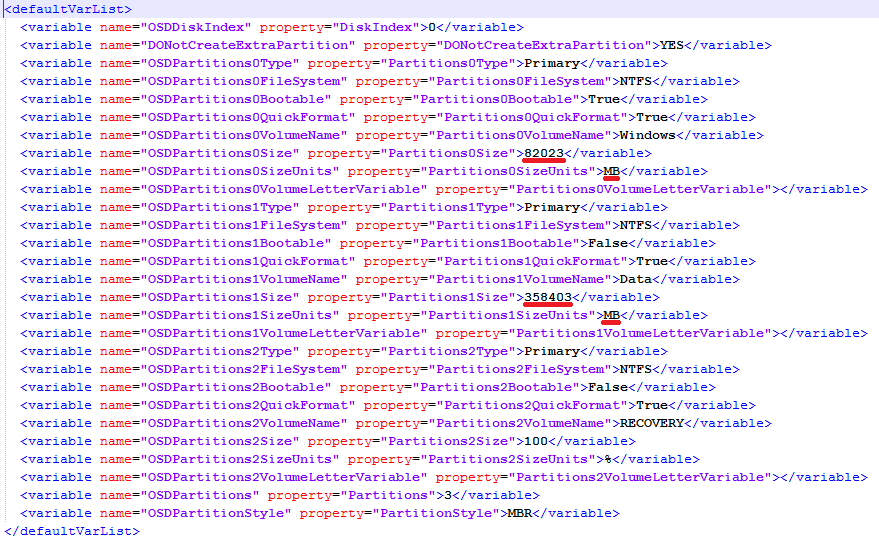
By editing the xml file of your task sequence manually we can achieve a perfect proportioned disk:

If we open up the manually editted task sequence we will notice the following values:

These values will not disappear if the task sequence is modified somewhere else. However if you tend to modify youre exisiting partition scheme after manually editting the task sequence you need to re-enter the requested partition sizes in Mb’s.

So there you have it! No 79,8 disks but real nice round 80 Gb or whatever the size you want disks!
MDT 2012 – Prepping a reference image with UEFI Bios Support

Published / by Rens Hollanders / Leave a Comment

So, my latest secondment job contains working for a major enterprise company for some months now were I’m involved in a major deployment project for 22k computers and we are going to use MDT 2012, I tought it would be better for me to turn MDT 2012 inside out! Next to the working thingy, I also help people who may have computer problems or are willing to buy a new computer. Most of the people I help are elderly and they just want a computer that works, is value for money and comes without the hassle of a slick sales person at the local electronics store.

Because I already installed several of the same computer types manually I wanted to use MDT 2012 since it is released this april’2012. Because ‘if you do things more then once, you can automate it’ some wise person once said.

When using MDT 2012 and creating a reference image the right way (like, building the ultimate ‘image’ in a virtual machine) to deploy it later on to targetted computers I encountered a problem I could not foresee earlier. UEFI Bios, the new computers that I deliver have UEFI Bios, and the great thing about UEFI Bios is that it needs GPT partition’s to be present or to be created at the hard drive. The great thing about Windows 7 is that it knows how to deal with the situation and it will be able to install itself problem free on a computer with an UEFI interface (stop calling the darn thing UEFI BIOS).

So now to create a reference image that is also capable of dealing with the UEFI requirements we need to create a virtual machine with UEFI instruction.
To do this, you can create a new virtual machine template from lets say a Windows 7 machine. (I use VMware workstation)

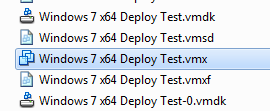
When the virtual machine is created, do not power it on but wait for a while and browse to the directory of the virtual machine itself. There you wil find the virtual machine configuration file and for the people who know, I’m talking about the *.vmx file. Edit this file with an extra line that states: firmware = “efi” and save the vmx file. When we now power on the virtual machine the machine thinks it is a EFI driven machine, and we can begin to create our new reference image. The sad thing of this is, that we now have to maintain two images, one with the traditional BIOS instructions, the other with the new EFI instructions and given the period BIOS is still present, this is going to be a long ride.

Just to be sure, here are some images to illustrate:

Select VMX file

Edit VMX file by adding the line firmware = “efi”

For more information, please see the following reference links:

  1. Install vSphere in VMware Workstation using EFI instead of a BIOS
  2. Installing Windows to an EFI-Based Computer
  3. Microsoft Deployment Toolkit (MDT) 2012 > Optional – MDT 2012 Print-Ready Documentation.zip > Using the Microsoft Deployment Toolkit.docx
  4. Create UEFI-based Hard-Disk Partitions by Using Windows SIM
  5. Recommended UEFI-Based Disk-Partition Configurations
  6. What is Windows System Image Manager?

The last thing I want to add, is that the problem can also be resolved by capturing your reference build made on a UEFI Virtual Machine and capture the entire disk > VHD to file and deploying this afterwards to your targetted machines.