Monthly Archives: January 2013

SCCM / MDT: identifying SSD’s from your Task Sequence by Windows Performance Index!

Published / by Rens Hollanders / 11 Comments on SCCM / MDT: identifying SSD’s from your Task Sequence by Windows Performance Index!

Many has been written about detecting SSD’s through WMI query’s and scripts to perform optimization settings for SSD’s when deploying Windows 7/8 to an SSD Disk.

And although there is no unique identifier to really determine if we are dealing with an SSD or traditional hard drive I believe I may have found something that works better then all the other available options.

For example there is the SSD Drive Script which queries for the ‘ random read rate’  and if it appears to be higher then 8Mb/s it will mark your drive as SSD.

Then there is also the WMI Query: wmic diskdrive get caption which queries for the disk Caption, and sometimes a vendor has written ‘ SSD’ into the Caption. But that is also to random.

Other alternatives are managing and detecting hard drive product names, but then there is always human intervention required to update the list, because hard drives are being renewed all the time.

Because the value of the SSD Drive Script sometimes outputs not the correct value I have found a better and more reliable tool to determine the hard drive type and speed. The integrated Windows Performance Index that is present within Windows 7/8. Because this performance assessment generates a properly random read/write rate which it looks you have to generate it yourself when your disk is idle at the time the ‘SSD Script’ is being run.

To initiate a Windows Performance Index rating we need our machine during deployment or patching to be rated.

We do this by adding a ‘ run command line’ with the following parameters:

C:\Windows\SysNative\WinSAT.exe formal

winsat

Next the Performance Index will rate the system performance and when ready have the hard drive assessed:

performance index

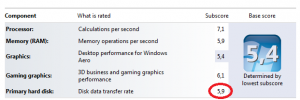
Obviously we cant see the rating when executing a task sequence and the Windows shell being locked, but if we would run a normal WinSAT benchmark this would be the result. And I have noticed that the values of a benchmarked traditional hard drive will not exceed 6.9 while SSD’s exceed 7.0 and more.

No we have something that we can use as a condition to either run or do not run SSD optimalization tasks in a SCCM / MDT task sequence, by using the following condition on a group of optimalization actions:

condition

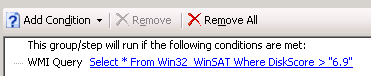
Because the machine’s hardware has been assessed a performance number has been assigned to the disk. If the disk is not rated the value always responds with zero. In this case we query if the hard drive performance rating is greater then 6.9, if this is the case we execute our SSD optimalization, if it is smaller we skip these steps.

*Alternatively, you can use the same query to execute the WinSAT benchmark for your system if it is allready rated, if it is rated it will skip the benchmark and if a machine is not rated, the benchmark will be executed.

Hope this may help you in your quest to detect and find a reliable condition from which the detection of SSD’s can be queried, and I hope that in the near feature other solutions may be handed to us.

MDT 2012 Settings for fully automated LTI deployment, Part I: Bootstrap.ini

Published / by Rens Hollanders / 17 Comments on MDT 2012 Settings for fully automated LTI deployment, Part I: Bootstrap.ini

So based on some blogs I’ve read and a recent project I have worked on to realize a fully automated Operating System Build, I wanted to share my settings just to clarify which settings need to be present within the bootstrap.ini and the customsettings.ini.

Part I: Bootstrap.ini

First of all, there is the bootstrap.ini. Customizing the bootstrap.ini affects all the settings which a machine will be booted with. In my case it was necessary to provide a static IP configuration because the server back-end where I had a test virtual machine to my disposal had no active DHCP running, therefore it is necessary to specify the IP configuration for one or more machines.

If we want to do this for one machine, we need to have a unique identifier which the settings can be applied to, in this case it would be the MAC Address of the virtual machine which in our case will not change automatically (VMware HyperVisor, on Hyper-V you need to specify a static IP). Therefore we set our Priority to MAC Addres 1st, and then the Default configuration options 2nd because we want those options to be applied to all clients.

[Settings]
Priority = MACADDRESS, Default

Then it is time to configure our network adapter, in case of a virtual machine it is likely that we have only one network adapter present. Therefore we need to specify the MAC Address of that adapter between the “[ ]”.

Next we specify the number of available network adapters, in case there is one we set our “OSDAdapterCount” to 1.
If there is no DHCP available we set the OSDAdapter0EnableDHCP to FALSE to make sure that when the machine boots into WinPE no instruction will be executed to request an dynamic provided IP address.

By specifying the following settings we provide our adapter configuration as we would normally do in Windows also when we want to specify a static IP address:

OSDAdapter0IPAddressList=Enter the machine’s IP address here
OSDAdapter0SubnetMask=Provide the correct subnet here
OSDAdapter0Gateways=Provide the gateway address
OSDAdapter0DNSServerList=Provide multiple DNS servers by using “,”
OSDAdapter0DNSSuffix=Provide the DNS Suffix so that machines that are not domain joined can still communicate with domain joined servers and computers

[00:00:00:00:00]
OSDAdapterCount=1
OSDAdapter0EnableDHCP=FALSE
OSDAdapter0IPAddressList=192.168.1.45
OSDAdapter0SubnetMask=255.255.255.0
OSDAdapter0Gateways=192.168.1.1
OSDAdapter0DNSServerList=192.168.1.11,192.168.1.12
OSDAdapter0DNSSuffix=contoso.local

*Note: working with multiple network adapters needs further explaination and luckely another MDT Exprert “Andrew Barnes a.k.a. Scriptimus Prime” has written a nice blog about that: MDT 2012: Automating Network Interface Configuration

Now we have specified our IP configuration based on MAC Address we can specify our Default settings which will be applied to al machines who will connect to the MDT deploymentshare.

Obviously we need a connection to our deploymentshare which is located on the network, with the property “DeployRoot” we specify the network location where the share is located.

By specifying “SkipBDDWelcome” we skip the screen where we can chose for running a new deployment, so that the wizard will automatically advance to the customized MDT wizard for deploying machines.

It is also possible to specify the keyboard layout allready, this is especially handy when you need to authenticate to your deployment share by password with keyboard symbols and characters.

[Default]
DeployRoot=\\servername.contoso.local\deploymentshare$
SkipBDDWelcome=YES
KeyboardLocalePE=nl-US

Then off-course it is time to configure our user account which is used to connect to the deploymentshare. No additional rights other then Read, List and Execute are necessary so an specified service account with ‘Domain User’ rights will do the trick if you set your NTFS and Sharing permissions right on the deploymentshare!

UserID=mdt_sa-account
UserPassword=P@55w0rd
UserDomain=contoso.local

So far my first part of explaining how to realize a fully automated deployment.

Please feel free to contribute in the comments

Download the script here:

zip
Bootstrap.txt