Tag Archives: litetouch

MDT – Linked Deployment Shares, Litetouch.vbs and CustomSettings.ini properties and priority (User Question)

Published / by Rens Hollanders / 2 Comments on MDT – Linked Deployment Shares, Litetouch.vbs and CustomSettings.ini properties and priority (User Question)

Last week Alexander reached out to me with the following question(s):

“Hello could I ask some questions?

  1. I am creating Linked Deployment Share, what difference between Merge and Replace, during creating?
  2. What properties do you recommend for using?
  3. Could you explain features of Extrafiles directory on MDT, how can I use It, and may be you know were I can find information about it. May be you know good examples?
  4. Is it important the order of positions priority in CustomSettings.ini
  5. Priority=DefaultGateway,Make,Default,SendMail
    Properties=OSDSendMailFrom,OSDSendMailTo,OSDSendMailSubject,OSDSendMailBody,
    OSDSendMailSMTPServer,OSDSendMailIncludeBDDLog,SavedJoinDomain and how could I understand what have to be first, second, third etc.
  6. What is Priority and Properties?
  7. What difference between LiteTouch.wsf and LiteTouch.vbs? And which script I have to start to implement replace scenario?

Thank you for your answers!”

Well Alexander, you didn’t hold back on asking questions, so let me ‘not’ hold back on giving answers 🙂

Linked Deployment Shares

Linked Deployment Shares is MDT’s mechanism to distribute and synchronize content which is originated with the MDT Deployment Share, to parent deployment shares or remote locations. Deployment Shares can be connected to other deployment shares, and this is called “Linked Deployment Shares”. Now how will MDT know what content to distribute and/or synchronize? This is determined by using selection profiles.

Selection profiles are profiles which can be created within MDT, under “Advanced Configuration” in the MDT workbench, and are no more or less then a list of items that are checked or unchecked by the person creating the profile. These profiles can be used for lot’s of things, such as driver profiles, package profiles, offline media profiles, and linked deployment share profiles.

Basically by checking and unchecking content from the MDT Deployment Share through the workbench console, you can decide which content needs to be distributed and synchronized from time to time.

Now you ask the purpose behind merge and replace. This can be best compared by doing a copy and paste action on a windows folder, which already holds content that you are going to copy/paste into the exact same folder. What happens is that the Windows Explorer File Manager will ask you what to do with the content: Replace, or do nothing. This action is similar to the replace or merge function. Merge means that content which is already present in the parenting deployment share will be maintained, while replace means that the entire content which is already present in the parenting deployment share will be replaced.

However, I would not recommend using linked deployment shares, since it is prone to error’s, and it lacks control, which you otherwise would have, when you use robocopy for instance. Even MDT guru Johan Arwidmark recommended me to use robocopy above using linked deployment shares, and I won’t argue with him on that point!

What properties do you recommend for using?

I’ve written a blog about my commonly used customsettings.ini properties, read it here

Could you explain features of Extra files directory on MDT…

The extra files directory is quite simple. But first, let us determine the extra files directory:

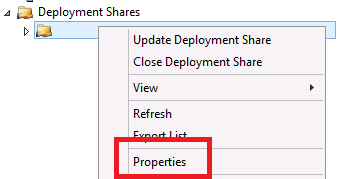
Go to your deployment share, right click on it, and click “Deployment Share Properties”

figure 1.1: Open Deployment Share Properties

DeploymentShareProperties

My approach has always been to embed extra files like this:

figure 1.2: Deployment Share – WinPE Properties

Extrafiles

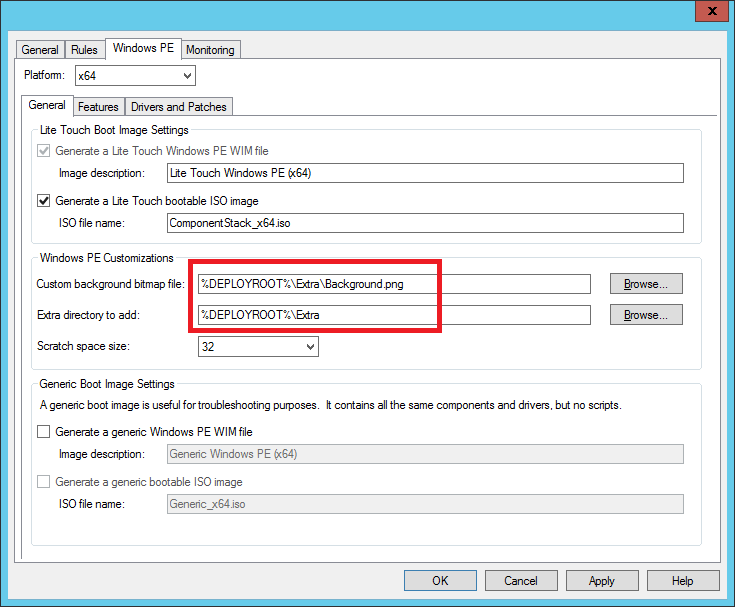
As you can see I’ve specified the extra files directory within MDT as following: “%DEPLOYROOT%\Extra” and the same goes for the Custom MDT background which is also located in in my Extra directory, the benefit of this is, that I can create a folder named “Extra” within my deploymentshare, and place all the content I need into my boot image, in this location:

figure 1.4: Extra folder

Extrafolder

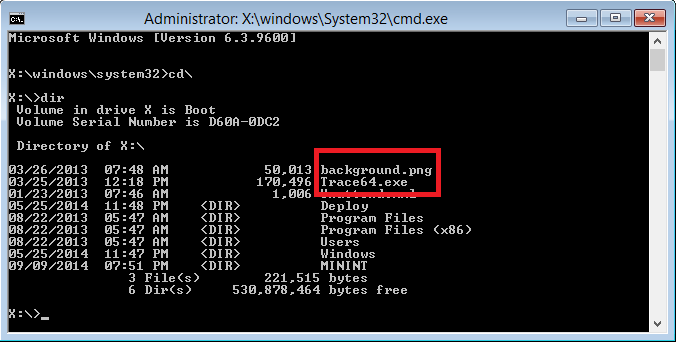
Next time when you will update or completely regenerate your boot images, the contents of the Extra folder will be present in your boot image, and it can be found by opening a command prompt and browse to the root of your drive: “X:\” there you will find trace64.exe for example, which is quite handy viewing logfiles, rather then using notepad.exe!

figure 1.5: Command Prompt in WinPE

Extracommandprompt

So there you have it, the Extra files directory in MDT

Is the order of  priority positions in CustomSettings.ini important?

Short answer: Yes, priority determines in which order subsections of the CustomSettings.ini is processed:

cs_rules_priority - Copy

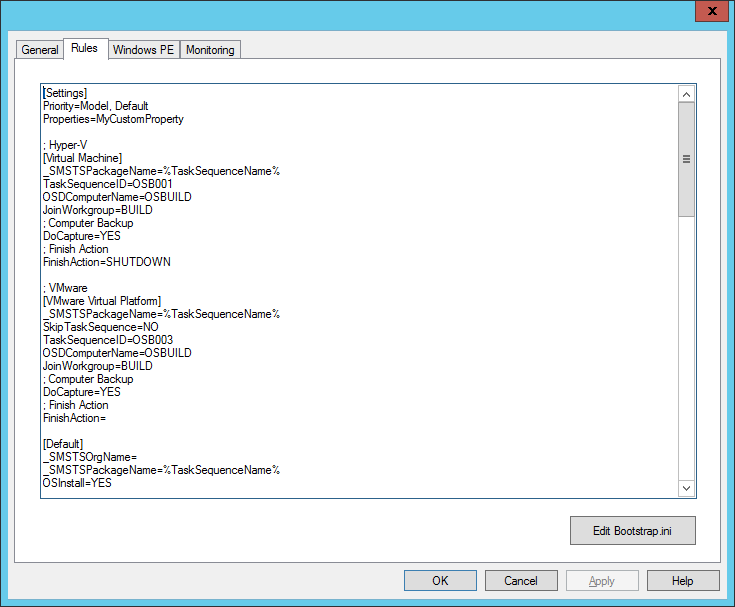
As you can see in this example, my priority order is as following: Priority=Model, Default. This means that first if the machine you are going to work with, matches the model description specified in the customsettings.ini this section will be processed first, before the default customsettings.ini rules will be processed.

This can be quite handy, if you want certain machines to join the domain, while others just need to be joined to a workgroup or the other way around. So yes priority matters, however the location of your subsection in Customsettings.ini does not. You can place the Model subsection beneath the Default section, and add in other subsections as well. This does not affect the priority.

What is Priority and Properties?

This question hooks onto the previous one:

  • Priority determines in which order Properties are processed
  • Properties represent objects which contain a value that MDT can work with since the scripts that are used within MDT rely on these properties.
  • The priority of properties is of no importance. It doesn’t matter if you place OSDSendMailFrom before OSDSendMailTo or OSDSendMailTo before OSDSendMailFrom, it just matters that the property is present.

So for example the Property “OSDComputerName” = HAL9000, this value will be collected during the Gather step in a task sequence, and then will be stored and used when the time is right to set the hostname of the machine, which happens during the setup phase of the operating system.

What’s the difference between LiteTouch.wsf and LiteTouch.vbs? And which script I have to start to implement replace scenario?

Good question, if you would have examined both script’s you will find the following:

Litetouch.vbs is used to start the deployment, and setup a connection with the deploymentshare. This process can either be initiated from within Windows, or from within WinPE, it doesn’t matter. Either way Litetouch.vbs is used. Litetouch.vbs can be started by double-clicking on it on a running Windows machine, but that’s just to easy since Windows recoqnizes VB script’s and know’s what to do with it.

The correct way to start Litetouch.vbs is to open an elevated command prompt and type: cscript.exe <path to litetouch.vbs\litetouch.vbs. This also provides some cool tricks to instantly specify certain values that litetouch.vbs can work with, for example: cscript.exe litetouch.vbs /tasksequenceid:<tsid> will initiate the mdt deployment which immediately calls the specified and desired task sequence!

figure 1.6: Litetouch.vbs

litetouch.vbs

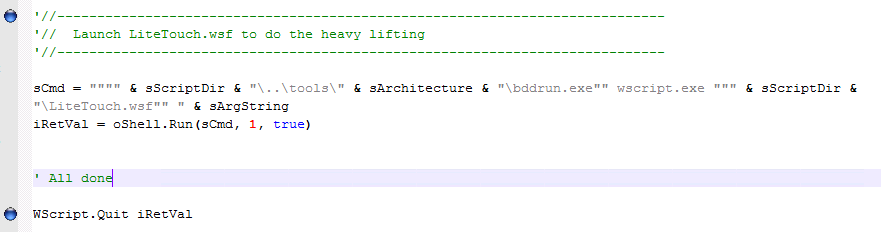
And as you can see here: Litetouch.vbs paves the way, Litetouch.wsf finishes what has been started!

About your replace scenario, this is not decided by either Litetouch.vbs or Litetouch.wsf but determined by the value which given to the property: “DeploymentType

This properties knows three known values:

  1. NEWCOMPUTER
  2. REFRESH
  3. REPLACE

And depending on the value you specify, one of these three scenario’s will kick-in. Just open your task sequence and look at the groups Refresh, Replace and view the options, to find a Task Sequence Variable is set as condition. And if the condition is met, these steps are executed during the deployment of the machine!

That concludes this blog, and I hope you Alexander and many others will find this information usefull in your way of working with the Microsoft Deployment Toolkit!

Cheers!

MDT 2012 Settings for fully automated LTI deployment, Part II: Customsettings.ini

Published / by Rens Hollanders / 48 Comments on MDT 2012 Settings for fully automated LTI deployment, Part II: Customsettings.ini

So my second part of how to achieve a fully automated deployment, can be used to create a reference image or to deploy a computer.

Lets start customizing 🙂

First of all we can set our priority and fortunately the ‘deployment bunny’ has written a great blog about the available properties for setting the priority in which order MDT executes which task with which properties:

[Settings]
Priority=MACAddress, Default
Properties=MyCustomProperty

In my case I have set the priority on MACAddress first, this means that MDT will look for a machine with the given MACAddress and apply the custom defined properties only for this machine. This is especially handy when we want to use our deploymentshare for more then one purpose alone. In my case the ability to create an automatic reference image but also being able to use other task sequences from that same deploymentshare to other computers.

So if we specify our MACAddress here, we can then apply the settings we want. In my case I start again with configuring the IP address for a virtual machine which occurs in a back-end server environment with no particular DHCP present on the VLAN.

[00:00:00:00:00]
OSDAdapterCount=1
OSDAdapter0EnableDHCP=FALSE
OSDAdapter0IPAddressList=192.168.1.45
OSDAdapter0SubnetMask=255.255.255.0
OSDAdapter0Gateways=192.168.1.1
OSDAdapter0DNSServerList=192.168.1.11,192.168.1.12
OSDAdapter0DNSSuffix=contoso.local

Then I specify that the task sequence wizard needs to be skipped by providing the following option: SkipTaskSequence=YES
And immediately after that I fill-in the desired TaskSequenceID which needs to be executed automatically, which is in my case OSB001 (Operating System Build 001)

SkipTaskSequence=YES
TaskSequenceID=OSB001

Next we need to provide an computer name for our reference build. With the SkipComputerName=YES we prevent the hostname wizard, but when we do this, we also need to provide an hostname for the upcoming deployment. The task sequence variable “OSDComputerName” will be picked up and understood by the scripts if provided.

SkipComputerName=YES
OSDComputerName=OSBUILD

Then to capture the created reference image we provide the following parameters:
SkipCaptures=YES obviously the wizard pane needs to be skipped. But because we want to capture our reference image, we provide the DoCapture=YES setting too, followed by the backup location which needs to point to an accessible network-share and provide the file-name for the captured WIM file.

SkipCapture=YES
DoCapture=YES
ComputerBackupLocation=\\server01.contoso.local\deploymentshare$\Captures
BackupFile=W7ENTSP1x64EN.wim

So far our custom properties for one particular fully automated Task Sequence. When all the other configurable options will remain the same we can configure these options beginning with the organization name displayed during deployment. The organization name displayed can be modified by providing the parameter “_SMSTSOrgName” and a value for the organizational name, for example “Contoso IT”. Further, OSInstall lets MDT know we want to deploy and operating system.

[Default]
_SMSTSOrgName=Contoso IT
OSInstall=Y

The following options are for preventing the multiple wizard panes popping up for input or requesting input. At default, we don’t want the Task Sequence wizard to skip, therefore we set this setting to “NO”. With SkipApplications and SkipAppsOnUpgrade we can see the apps that will be installed if the Application Guid has been provided in the customsettings.ini. Once again, Andrew Barnes has written a nice blog about that particular subject.

Skipping the capture, makes sure that your deployment will not ask you to start capturing at the end of the deployment and defining the property DoCapture=NO answers the question that your deployment will not be captured.

SkipTaskSequence=NO
SkipApplications=NO
SkipAppsOnUpgrade=YES
SkipCapture=YES
DoCapture=NO

Then a few more obvious properties; SkipAdminPassword prevents the wizard pane for providing your local admin password for the machine that will be deployed. SkipProductKey will skip the request for a valid product key which should / could already be filled in in your unattended.xml. The SkipDeploymentType and DeploymentType evaluate what kind of deployment scenario will be used, because there are tree scenario’s possible: NEWCOMPUTER, REFRESH, REPLACE

NEWCOMPUTER
The target computer is a new computer that has never been a member of the network.
REFRESH
The target computer is an existing computer on the network that needs the desktop environment standard to be redeployed.
REPLACE
An existing computer on the network is being replaced with a new computer. The user state migration data is transferred from the existing computer to a new computer.

SkipAdminPassword=YES
SkipProductKey=YES
SkipDeploymentType=YES
DeploymentType=NEWCOMPUTER

Then we are going to join the computer to our domain, SkipDomainMembership=YES means we will not see the domain join wizard pane. If we provide the following additional parameters the computer will automatically join the specified domain:

SkipDomainMembership=YES
MachineObjectOU=OU=Computers,OU=Laptops,DC=contoso,DC=local
NetworkLocation=Work
JoinDomain=contoso
DomainAdmin=srv-rollout
DomainAdminDomain=contoso
DomainAdminPassword=

If there is userdata that needs to be migrated the following can be specified “SkipUserData” and “UserDataLocation”, if any existing profiles are present on the computer an USMT MIG file will be created which can be placed back after the OS deployment has been completed. More information on MDT in combination with USMT, please check this blog

SkipUserData=YES
UserDataLocation=\\server01.contoso.local\deploymentshare$\USMTdata

The only wizard pane we would like to see if we cannot prepopulate the hostname in advance is the ComputerName pane, by providing the following setting we will be asked for an hostname:

SkipComputerName=NO

Then the locale selection can be prepopulated too! “SkipLocaleSelection” and “SkipTimeZone” will hide or show the locale selection wizard pane, providing the following parameters will set the locale settings:

SkipLocaleSelection=YES
SkipTimeZone=YES
TimeZoneName=W. Europe Standard Time
TimeZone=110
AreaCode=045
Language=00000413
SystemLocale=00000413
UserLocale=en-US
UILanguage=en-US
InputLocale=nl-US
KeyboardLocale=nl-US

A new addition to my customsettings.ini (which I have added december 2013) is setting the native resolution for each device, by providing the following settings, the machine will be forced to start “enable auto detection” of display settings. This way, you’re always getting the most optimized resolution settings for your device. See this blog for more information.

; Display Settings
BitsPerPel=32
VRefresh=60
XResolution=1
YResolution=1

“SkipBitLocker” will show the Bitlocker configuration pane during deployment, and the last of the regular wizard panes “SkipSummary” wil not show the configured properties of which the deployment will commense with after we have clicked next.

SkipBitLocker=YES
SkipSummary=YES

Setting the homepage for every deployment that will be executed, use the property: Home_page=

Home_page=http://www.contoso.com

Supplying the eventservice, makes sure that live monitoring will be reported back to the MDT deploymentshare at which current step your deploymentphase actually is.
Providing the value “SLSShareDynamicLogging” provides actual replication of the BDD.log which covers all the actions executed by the task sequence and is a nice feature for centrally logging the deployment progress!
In the end, using “HideShell” makes the Windows 7 GUI disappear and only the MDT progressbar visible for the length of the deployment.

EventService=http://CONTOSO01:9800
SLShareDynamicLogging=%DeployRoot%\Logs\%COMPUTERNAME%
HideShell=YES

In the end we specify which WSUS updates will not be included in the update process. Because enabling the two steps already present in the task sequence “Windows Update (Pre-Application Installation)” and “Windows Update (Post-Application Installation)” will start querying your WSUS server or Windows Update Server on the internet and download all available Windows update present at that time. To exclude certain updates we can first of al run a /query from which we can easily see which updates are being advertised to our computers.

By providing the following additional command: “/query” to the already existing command: “cscript.exe “%SCRIPTROOT%\ZTIWindowsUpdate.wsf”” we can see in our BDD.log which updates are being advertised to the system.

In my case I wanted to exclude the following updates:

;Microsoft Browser Choice Screen Update for EEA Users of Windows 7 for x64-based Systems (KB976002)
WUMU_ExcludeKB1=976002
;Microsoft Silverlight (KB2636927)
WUMU_ExcludeKB2=2636927
;Windows Internet Explorer 9 for Windows 7 for x64-based Systems (KB982861)
WUMU_ExcludeKB3=982861
;Bing Desktop (KB2694771)
WUMU_ExcludeKB4=2694771

Note that each update that needs to be excluded needs to be specified seperately, and numbered each time with a higher number for every new to be excluded updated.

Hope that this provides some insight in creating a fully automated reference image and explains the purpose of each property in the way that I have experienced it.

Download the script here:

zip
CustomSettings.txt

MDT 2012 Settings for fully automated LTI deployment, Part I: Bootstrap.ini

Published / by Rens Hollanders / 17 Comments on MDT 2012 Settings for fully automated LTI deployment, Part I: Bootstrap.ini

So based on some blogs I’ve read and a recent project I have worked on to realize a fully automated Operating System Build, I wanted to share my settings just to clarify which settings need to be present within the bootstrap.ini and the customsettings.ini.

Part I: Bootstrap.ini

First of all, there is the bootstrap.ini. Customizing the bootstrap.ini affects all the settings which a machine will be booted with. In my case it was necessary to provide a static IP configuration because the server back-end where I had a test virtual machine to my disposal had no active DHCP running, therefore it is necessary to specify the IP configuration for one or more machines.

If we want to do this for one machine, we need to have a unique identifier which the settings can be applied to, in this case it would be the MAC Address of the virtual machine which in our case will not change automatically (VMware HyperVisor, on Hyper-V you need to specify a static IP). Therefore we set our Priority to MAC Addres 1st, and then the Default configuration options 2nd because we want those options to be applied to all clients.

[Settings]
Priority = MACADDRESS, Default

Then it is time to configure our network adapter, in case of a virtual machine it is likely that we have only one network adapter present. Therefore we need to specify the MAC Address of that adapter between the “[ ]”.

Next we specify the number of available network adapters, in case there is one we set our “OSDAdapterCount” to 1.
If there is no DHCP available we set the OSDAdapter0EnableDHCP to FALSE to make sure that when the machine boots into WinPE no instruction will be executed to request an dynamic provided IP address.

By specifying the following settings we provide our adapter configuration as we would normally do in Windows also when we want to specify a static IP address:

OSDAdapter0IPAddressList=Enter the machine’s IP address here
OSDAdapter0SubnetMask=Provide the correct subnet here
OSDAdapter0Gateways=Provide the gateway address
OSDAdapter0DNSServerList=Provide multiple DNS servers by using “,”
OSDAdapter0DNSSuffix=Provide the DNS Suffix so that machines that are not domain joined can still communicate with domain joined servers and computers

[00:00:00:00:00]
OSDAdapterCount=1
OSDAdapter0EnableDHCP=FALSE
OSDAdapter0IPAddressList=192.168.1.45
OSDAdapter0SubnetMask=255.255.255.0
OSDAdapter0Gateways=192.168.1.1
OSDAdapter0DNSServerList=192.168.1.11,192.168.1.12
OSDAdapter0DNSSuffix=contoso.local

*Note: working with multiple network adapters needs further explaination and luckely another MDT Exprert “Andrew Barnes a.k.a. Scriptimus Prime” has written a nice blog about that: MDT 2012: Automating Network Interface Configuration

Now we have specified our IP configuration based on MAC Address we can specify our Default settings which will be applied to al machines who will connect to the MDT deploymentshare.

Obviously we need a connection to our deploymentshare which is located on the network, with the property “DeployRoot” we specify the network location where the share is located.

By specifying “SkipBDDWelcome” we skip the screen where we can chose for running a new deployment, so that the wizard will automatically advance to the customized MDT wizard for deploying machines.

It is also possible to specify the keyboard layout allready, this is especially handy when you need to authenticate to your deployment share by password with keyboard symbols and characters.

[Default]
DeployRoot=\\servername.contoso.local\deploymentshare$
SkipBDDWelcome=YES
KeyboardLocalePE=nl-US

Then off-course it is time to configure our user account which is used to connect to the deploymentshare. No additional rights other then Read, List and Execute are necessary so an specified service account with ‘Domain User’ rights will do the trick if you set your NTFS and Sharing permissions right on the deploymentshare!

UserID=mdt_sa-account
UserPassword=P@55w0rd
UserDomain=contoso.local

So far my first part of explaining how to realize a fully automated deployment.

Please feel free to contribute in the comments

Download the script here:

zip
Bootstrap.txt